|
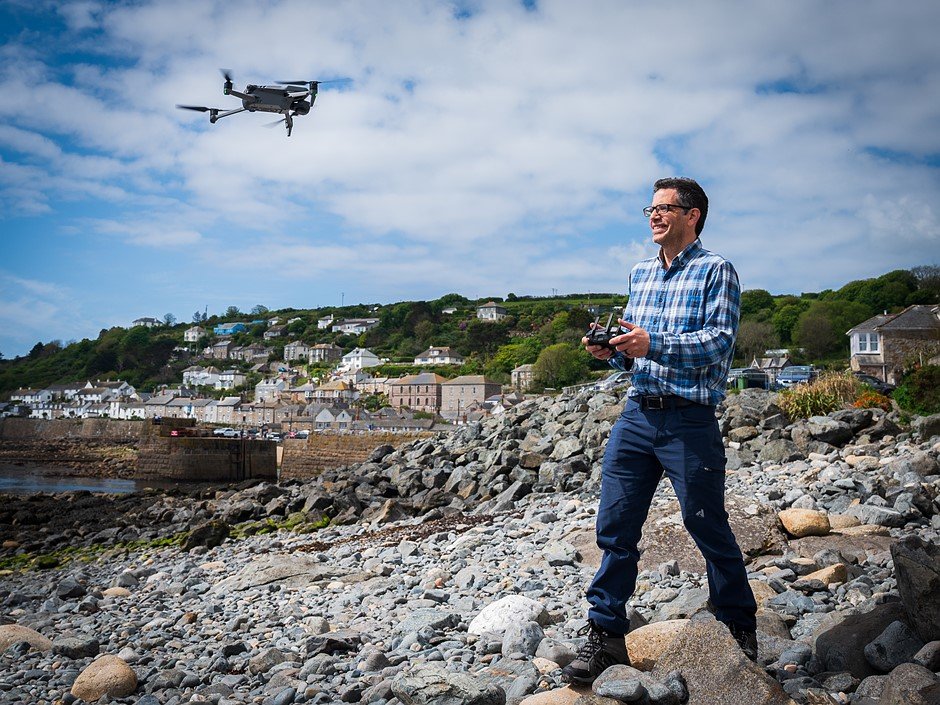
Flying the DJI Mavic 3 Cine in Cornwall, England to shoot the landscape at low and later at high tide. I am using the DJI RC-N1 Remote to control the drone. Photo credit: Lee Pullen |
I have been using the DJI Mavic 3 Cine for one year now. I rely on drones to capture video and stills of natural landscapes for my Science & Symphony Films that are presented in concert halls around the world. Having used this drone for professional work for some time, I’ve rounded up a number of features I think are great, and some issues I’ve encountered that need improvement.
Note: just as I was finishing this article DJI released two major firmware updates (v1.000.1000 being the latest as of writing) that not only addressed the issues I mention below, but added some superb new features. I’ll mention the beneficial impacts of the firmware updates as I go.
Motivation
One of the films I’m working on, Moontides, is about the most extreme lunar tides on Earth. A drone can provide a unique point of view on how dramatically a landscape can change in just six hours – going from low to high tide and vice versa. For this film I visited the Cornish coast of England and the Bay of Fundy in Nova Scotia, Canada. The photography was done around the full moon since during full and new moon the Sun and Moon are aligned with our planet, producing more extreme tides.
The second film, Liquify, follows water from mountain tops and glaciers all the way to the ocean. For this film I visited the southern coast of Iceland since within a relatively short driving distance you can see mountain tops, rivers, waterfalls, glaciers, lagoons and coastlines.
For both films I used the Mavic 3 Cine for my aerial footage.
 |
| Two (cropped) panoramas showing the rising tide at Mousehole, Cornwall, UK. The panoramas were shot 6 hours apart. |
When the Mavic 3 Cine was announced, three things quickly motivated me to purchase it: its compact size, its long battery life and its internal SSD memory. The first two of these features turned out to be everything I’d imagined, but the third proved to be annoying at times – until just recently when my issues were addressed with firmware updates.
Compact size
One of the Mavic 3 attributes I really enjoy is how compact it is, yet without sacrificing image quality. When folded, the Cine is only 22 cm × 9.6 cm × 9 cm (8.7 in x 3.8 in x 3.6 in).
What’s good:
The drone and accessories fit nicely in its carrying bag (included with the Combo package), which easily fits into my camera backpack. The fact that I can combine the Mavic 3 Cine with other photo gear in one backpack is a big plus for me.
Long battery life
The Mavic Cine 3 uses a fairly a compact Intelligent Flight Battery (capacity: 5,000 mAh). At 336g (11.9 oz), this battery makes up more than a third of the drone takeoff weight of 899g (31.7 oz). That tells you how light the drone itself is! In order to avoid stopping my workflow during the day, I charge three batteries in the Battery Charging Hub overnight. Each takes approximately 1.6 hours to charge. You get the Hub with the Combo package.
What’s good:
The Mavic Cine 3’s maximum flight time of 46 minutes has changed the way I work. With the flight times of 30 minutes or less on earlier models, I found that by the time I was getting the shots I needed I had to turn around and land the drone to change the battery. With the Mavic 3 I find myself satisfied with the shots I have obtained only to discover that I have 20 more minutes or so of flight time left. This allows me to be more creative and experimental.
Internal SSD
In addition to a slot for microSD cards, the Cine model includes an internal 1 TB SSD with approximately 935 GB of available space. This large capacity is particularly beneficial when shooting video using the high-quality Apple ProRes 422 codec.
What’s good:
- The 1 TB SSD allows me to shoot approximately 3.75 hours of 4K/30p ProRes 422 video, plenty for one day’s work. Alternatively, it can store 2.5 hours of ProRes 422 HQ, 15.5 hours of H.264, and 20.25 hours of H.265 30 fps video.
- When plugged in to a computer, the Mavic 3 Cine’s SSD automatically mounts as an external drive, with transfer speeds of up to 0.80 GB/s. When connected, the battery inside the drone will start to charge as well.
What needs improvement:
- On more than one occasion, the DJI Fly app warned me in mid-flight that the drive was highly fragmented and that it needed to be reformatted. While I was still allowed to capture video, this error interfered with shooting panoramas. I explained to DJI customer support that this warning has come up several times even when the drive is less than half full. They had no immediate solution but asked me to send them the drone for service.
After the firmware updates:
-
Prior to the latest firmware update, any microSD card in the Mavic 3 Cine would also mount on my computer but I could only browse its content, not copy the files. Now, just like with the SSD, I can drag-and-drop its content to my computer.
Outside of these three primary benefits to my workflow, the DJI Mavic 3 Cine has a lot of useful modes and features that have made it extremely useful.
Flying the Mavic 3 Cine
The Mavic 3 Cine features three flight modes with different maximum flight speeds: Cine (5 m/s), Normal (15 m/s) and Sport (19 m/s). Other settings let you cap the speeds at which the camera tilts (pitch) and pans (yaw). For example, the amount of time the drone takes to pan 360 degrees can be as long as 45 seconds and as short as 1 second! It gives you two gimbal modes, one to keep the gimbal fixed on the horizontal, the other to have it stick to the orientation of the drone for a first-person view.
Although the dedicated remote controller is very bright, the sky can be very bright as well. I found that by placing a dark jacket over my head and controller I could focus better on the screen and on all the independent flying and gimbal controls. Sitting down and placing the control on my lap also helps me, and if I cannot cover my head then I try to find an open and shaded area where I can sit down. An assistant keeps the drone within sight for me while I concentrate on the flying.
Below is one of my first flights of the DJI Mavic 3 Cine while capping the speed of the drone and the gimbal. Following are my thoughts on piloting it.
Flying the Mavic 3 manually in Cine Mode (5 m/s max. speed). 5.1K 50fps 10-bit D-Log video color-graded with the DJI Mavic 3 LUT. Mousehole, Cornwall, UK
What’s good:
- The gimbal speed control and the flight modes with their corresponding maximum speeds help me maintain a smooth flight path and avoid abrupt changes in motion, which can ruin the cinematic shots I want to get.
- Although I usually shoot with the gimbal aligned with the horizon (Follow Mode), I like the option of having the gimbal follow the movement of the drone (First-Person View or FPV).
- Not once in my year of flying did I need to calibrate the Mavic 3 Cine’s gimbal because of misalignment with the horizon.
What I felt needed improvement:
- When you turn left or right in FPV Mode the gimbal follows the movement of the drone gradually, but when you stop turning the gimbal falls back to the horizontal position abruptly. This behavior makes the FPV Mode useless when trying to achieve cinematic results.
After the firmware updates:
-
DJI addressed the issue with the gimbal returning too abruptly to the horizontal position in FPV mode. Now, the camera comes out of a turn smoothly, making this mode useful for achieving cinematic shots.
- Note that DJI has renamed the section where you set maximum speeds to the not-so-obvious name of Gain and Expo Tuning.
Intelligent Flight Modes
 Flying the Mavic 3 Cine at different times to show the contrast between high and low tides at a location experiencing extreme lunar tides. Hall’s Harbour, Nova Scotia, Canada.
FocusTrack
DJI has a feature it calls FocusTrack, which can lock on a subject and fly while keeping the subject – either stationary or moving – in the frame. Depending on the mode, there are a lot of parameters pilots can choose from.
When shooting Moontides, I ventured to the Bay of Fundy in Nova Scotia, Canada. There I wanted to capture the beautiful and interesting sea stacks – large columns of rock that are cut off from the shoreline by erosion. To fly around one of these stacks while keeping it in the frame was a breeze with the Spotlight mode. I was able to change drone altitude, distance to the subject, and position of the stack in the frame in a smooth and seamless way.
Flying the Mavic 3 Cine around a sea stack (or flower pot) using Spotlight to keep my subject in the frame. Notice how the Mavic 3 did not lose track of the subject even when it was momentarily blocked by tall trees. Nova Scotia, Canada.
What’s good:
- I have used all FocusTrack modes successfully and have been very impressed with the way ActiveTrack smoothly avoids obstacles by either flying over, under or around them with the help of DJI’s Advanced Pilot Assistance System 5.0.
- The mode I have used the most is Spotlight, since it provides the perfect combination of flying manually around a subject while automatically keeping the subject in the frame.
Flying the Mavic 3 Cine around the same sea stack as above but during high tide. Notice how dramatically the landscape has changed. Nova Scotia, Canada.
Hyperlapse Modes
The Mavic 3 allows you to shoot hyperlapse videos. These are timelapse sequences shot with the camera in motion – either while you fly freely or by using one of a series of pre-programmed maneuvers: Circle, Course Lock, and Waypoints.
Circle works like Point of Interest; Course Lock lets you set the direction of flight in a straight line while giving you independent control of the direction of the camera; and Waypoints flies the drone and orients the camera according to a pre-determined path you set up using up to five drone positions.
What’s good:
- The availability of Cruise Control (see below) lets you maintain a constant speed and achieve smoother videos.
- All individual frames are saved as RAW or JPEG.
- The drone will automatically generate a timelapse video from the image sequence.
What needs improvement:
- When using Intelligent Modes, neither shooting 5.1K video nor shooting in 10-bit D-Log are available. This wasn’t a dealbreaker for me, but the latter was a sorely missed feature since for me color-grading is crucial to achieve a consistent look in my video productions.
After the firmware updates:
- The firmware updates fixed an issue with hyperlapse mode where the app would freeze the screen after each shot, giving the illusion that you had lost connection with the drone. Now the live video is free of interruptions while shooting hyperlapse sequences.
Cruise Control and Waypoint Flight
Two major features were added in the latest firmware updates. The first one, Cruise Control, lets you set a constant speed while you fly the drone and control the gimbal. This feature helps us to obtain cinematic footage by avoiding accidental, unwanted changes in speed. Cruise Control can not only maintain a constant speed but also a constant yaw motion.
You can set one of the customizable buttons of the remote controller to enable, disable, and update Cruise Control while in flight. Beware: if you are changing elevation while setting Cruise Control, a constant elevation motion will also be set, possibly resulting in unintended consequences.
The second firmware update added true Waypoint Flight (i.e., not just in hyperlapse mode), something I was sorely missing when I started writing this article. This feature provides the ability to program flight parameters (e.g., altitude, speed, lens zoom, hovering time, camera action, and either heading and gimbal tilt or Point of Interest), after which the drone flies smoothly from one waypoint (GPS location) to the next.
 |
| For my first Waypoint test flight I flew to six points, hovered, and decided what to do next. On my my second test flight I flew continuously and added 22 waypoints in mid-flight by pressing the C1 button. Once you are done setting the flight path, you can go into each individual waypoint and edit its parameters. |
The app lets you save a waypoint track as a Flight Plan, that you can fly again and/or edit later. If you need the drone to follow a specific path and a specific set of actions, you can test the flight path and tweak it until you are absolutely satisfied with it. You can also choose the drone action at the end of the flight path (for example, hover, return-to-home) and in the case of losing signal.
I wish Waypoint flight had been available when I was photographing the lunar tides for my film. This feature would have let me photograph the same landscape from the exact same point at low and high tide, whereupon I could have cross-dissolved from one scene to the other or presented them as a split screen.
I was very curious to see how accurately the Mavic 3 Cine could repeat a Waypoint flight, so right after I saved my first test flight, I commanded the drone to re-fly this 6-waypoint flight of almost one minute duration. Below you can see that the accuracy of the Waypoint Flight Path is limited only by the accuracy of the GPS. The results are so impressive that I can’t wait until my next opportunity to photograph the lunar tides!
Test of how accurately one can recreate a Flight Path using Waypoints. Top left and right: two recreations of a saved Waypoint flight. Bottom left: the flight path shown on the DJI Fly app map. Bottom right: the recreated path stacked in Difference Mode to better compare them. Notice how similar the two paths are.
Panoramas
Most of the photos I take with drones are shot as panoramas since I love the wide vistas an aerial point of view provides. Since you get all the individual shots (in DNG RAW or JPEG) besides the stitched panorama (in JPEG) you have plenty of options afterwards.
The Mavic 3 Cine offers four kinds of panoramas: Vertical, Wide, 180 Degrees, and Spherical. Vertical shoots 3 photos in 3.5 seconds to cover approximately 128 degrees vertically. Wide shoots 9 photos in 14 seconds to cover almost 180 degrees horizontally. 180 Degrees shoots 21 photos in 33 seconds to cover more than 180 degrees horizontally, and Spherical shoots 25 photos in 40 seconds to cover 360 degrees horizontally and 125 degrees vertically—from the nadir to 35 degrees above the horizon.
 |
| Wide panorama composed of 9 photos shot in Auto Exposure Mode and stitched in Adobe Lightroom. F2.8, ISO 100. Höfn, Iceland. |
Most of the panoramas I shoot with the Mavic 3 Cine are Spherical – as long as I have time and battery charge – and I use either Adobe Lightroom or PTGui to select all or a subset of the images to provide the field of view that I need. Another advantage of Spherical panoramas is that in post I can choose the orientation (yaw) of the final image.
What’s good:
- The Mavic 3 automatically stitches the photos (a process that takes from 11 to 40 seconds depending on the type of panorama) and lets me preview the result while still in the air.
What needs improvement:
- When my unit shot panoramas in the Wide format a subset of the photos were tilted with respect to horizon, resulting in warped panoramas. DJI customer support had no immediate solution and asked me to send the drone for service; this was the second issue that they needed to troubleshoot for me.
 |
| Spherical panorama composed of 25 photos shot in Auto Exposure Mode and stitched in PTGui with a ‘tiny planet’ projection. F2.8, ISO 100. Jökulsárlón, Iceland. |
DJI RC-N1 Remote Controller
The Mavic 3 Cine was my first drone with a dedicated remote control and I have no interest in going back to a control that requires the cumbersome setup of a smartphone. The RC-N1 remote controller’s internal rechargeable battery can be charged in 90 minutes (via a 15V USB charger) and operates the controller for 3 hours. The last two firmware updates, v04.17.0800 and v04.17.0300, should get you a stable experience with only one bug I noticed.
What’s good:
- The RC-N1 features a bright 1920 x 1080 14cm (5.5″) screen in a fairly compact and ergonomically designed controller.
- Many features available on the app via touchscreen can also be accessed directly via 4 programmable custom buttons and 2 dials. I have programmed these to control gimbal behavior and access camera exposure settings. For example, by pressing the C1 button I can instantly point the camera downward to either explore my location or take photos from straight above.
- The controller makes it easy to take screenshots and record the screen.
The one bug:
- When I open the DJI Fly app while the the controller is in Cine Mode, the app erroneously shows that the Mode switch is set to Normal. In order to set it to Cine I have to switch it to Normal and then to Cine again. This is clearly a bug and I hope DJI resolves it in the future.
Is the Mavic 3 Cine a good drone for pros?
The answer to this question when I started writing this article was: ‘almost.’ The DJI Mavic 3 Cine is the drone I have enjoyed using the most. I’m very happy with the image quality, and the ability to shoot in D-Log ProRes 422 is definitely a plus for me. Its APAS 5.0 system is very impressive and I like how its smooth avoidance results in videos that can be used in professional productions.
With DJI’s recent addition of the feature that I was missing the most, Waypoints, plus Cruise Control, I have changed my answer to: ‘definitely.’ I am very pleased with how DJI has rolled our new features for the Mavic 3 Cine. Yes, it would it have been better to get all these features from the start, especially for my films. But it’s better than the alternative of never getting them at all. Keep them coming, DJI!
creditSource link